


Chair yoga can be useful for older adults who have issues with balance or would like to improve their strength. Using a chair can help reduce the risk of falls and make the exercises easier for beginners.
Chair yoga may be beneficial for people:
- with balance issues
- looking to start slowly
- who would feel more confident starting out seated
Seated yoga has the same benefits as regular yoga, such as helping with stress, pain, and fatigue.
Notes on safety
You want to use a sturdy chair that you feel comfortable and stable in, preferably without arms.
Begin each new pose firmly seated in the chair. Sit toward the front edge of the seat but not so far that you feel unstable.
Research to date on chair yoga has typically involved smaller studies. However, the results have been mostly positive.
Chair yoga may have the following benefits:
- Improved strength: A small 2019 study of 31 community-dwelling older females found that 12 weeks of chair yoga improved strength in the hands, arms, and legs. However, more research is needed.
- Improved balance: The same study found that the participants saw improved balance, agility, gait, and flexibility following the 12 weeks of chair yoga.
- Help with osteoarthritis: A small 2023 study of 85 older Taiwanese females with osteoarthritis (OA) of the knee found that after 12 weeks of chair yoga, the participants saw improved functional fitness, which suggests it may be helpful for those with joint issues.
- Improved quality of life: A
2019 research review notes that chair yoga can benefit physical strength and flexibility, as well as mental well-being in older adults.
Tips for getting started
- Start slow and gradually increase the number of chair yoga sessions you do each week.
- Listen to your body. Stop doing any pose that causes too much pain, and speak with your healthcare professional.
- If possible, speak with a physical therapist about the best poses for your circumstances.
- Speak with a healthcare professional before beginning a new exercise routine.
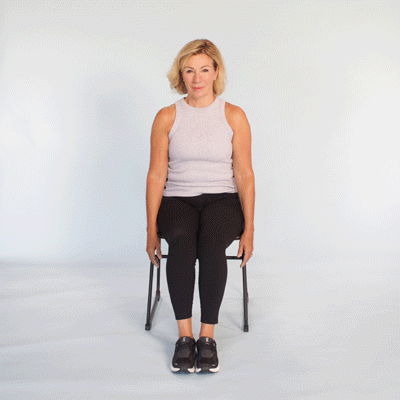
- Sit in a chair, bringing the soles of your feet to the floor.
- Align your ankles and your knees.
- Elongate your spine from the top to the bottom, extending your vertebrae.
- Inhale while drawing your shoulders forward and up.
- Exhale while rolling your shoulders down and back.
- Repeat as many times as desired.
- Sit near the front of your chair.
- Turn your body to the right and move closer to the left edge of the chair to create more support for your right thigh.
- Extend your left leg back and straighten it as much as possible.
- Check your hip alignment. Make sure both hips are squared to face forward.
- If it is comfortable, tuck your back toes under in a lunge position. If not, you can leave your foot flat on the floor.
- If you feel stable enough, you can lift your arms straight over your head, keeping your shoulders away from your ears. Alternatively, you can rest your hands on your hips or the seat of the chair for more balance.
- Sit toward the edge of the chair with your feet flat on the floor and your knees bent.
- Straighten your legs out in front of you, keeping your heels on the floor and your toes pointing upward.
- Inhale and lengthen your spine.
- Exhale and slowly begin to fold forward at the hips.
- Allow your torso to move toward your legs, reaching for your feet, ankles, or shins, depending on your flexibility.
- Maintain a straight spine as you hold the position for a few breaths, deepening the stretch with each breath.
- Inhale and slowly return to the upright seated position.
- If you are able, cross your right thigh over your left. Wrap your right foot around your calf, if you can.
- Cross your left arm over your right at the elbow.
- Bend your elbows and bring your palms to touch.
- Lift your elbows while dropping your shoulders away from your ears.
- Hold the pose for 5 seconds as you take some deep breaths.
- Repeat on the other side.
If you are unable to cross your legs or find that it causes stress on your lower back, you can modify this pose by keeping your feet flat on the floor and just doing the arms.
- Sit near the edge of the chair with your back straight and your feet flat on the floor.
- Inhale and reach your arms out to your sides.
- Exhale slowly and reach your arms behind your back, bending your elbows slightly.
- Arch your back slightly to deepen the stretch.
- Hold the pose for a few breaths.
- Slowly return to the starting position.
- Sit toward the front of the chair with a straight back.
- Place your right hand on your left knee and your left hand on the back of the chair.
- Inhale to lengthen your spine.
- Exhale as you gently twist to the left, looking over your left shoulder.
- Hold the pose for 2 to 3 breaths.
- Inhale and slowly return to the starting position.
- Repeat on the other side.
It is important not to use the back of the chair to force your body into a deeper twist. Listen to your body’s natural stopping point and only twist that far.
- Sit at the front edge of the seat with your left foot flat on the floor.
- Extend your right leg out in front of you.
- Inhale and lengthen your spine.
- Exhale and gently fold forward over your outstretched leg.
- Hold the stretch for a few breaths.
- Inhale and slowly return to the starting position.
- Relax for a few breaths and repeat on the other side.
There are various benefits of chair yoga. These include improved strength, balance, and quality of life.
These types of stretches can be ideal for people with balance issues, osteoarthritis, and those looking to start slowly into yoga.
Yoga poses done in a chair have the same benefits as those done standing or sitting on the floor. You should speak with a healthcare professional before beginning a new exercise routine.